Grunz
Posts: 32
Registered: 3-7-2014
Member Is Offline
|
|
posted on 15-11-2018 at 23:31
|

|
|
Scalex AMG GT3 - DiSCA Conversion
The Mercedes AMG GT3 does not need any presentation: it is one of the iconic cars in the GT3 competition across the globe. It is also one of the most
successful platforms especially when behind the wheel is a very talent driver like Raffaele Marciello. For the 2018 Blancpain season, Marcello won the
Blancpain GT Sprint series with the AKKA ASP Team and was really close to get the Endurance Cup title as well (won by another Mercedes team by the
way).
For the 1:32 world, several options are available: Carrera was the first one to produce a model of this car, followed by Scalextric. Good news is that
as for October 2018, Scaleauto has announced their whitekit for this model as well – which looks very promising at least from the pictures I have
seen.
In this article, I will concentrate on converting a Scalex Mercedes AMG from a toy car to a serious racer under the DiSCA GT3 specs. The main
specifications require an AW motor setup using the powerful Scaleauto Baby Sprinter. To make things more interesting, the specs allow one to reduce
the body weight to 19gr including the interior (lexan allowed) and the lights (mandatory working front lights for start of the race).
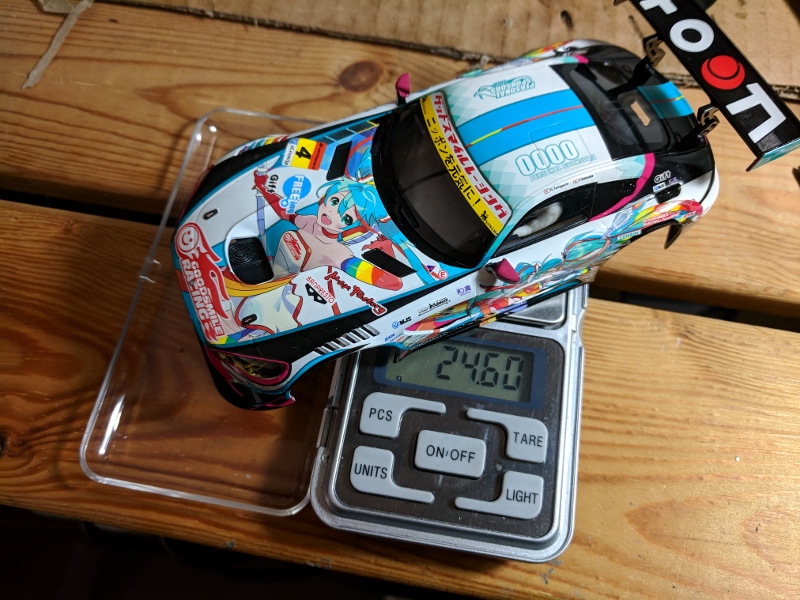
The new breed of Scalex cars already sport a lightweight body with a flat tray interior.

The starting point is not too bad: tipping the scale at 24.60 gr, this car as some potential.

The original interior tray and the rear wing both weigh more than 6 gr. When the body is stripped down from windows, headlights and other small parts
its weight drops to a mere 13.53 gr. This is a very good starting point but we can do better than that. First of all, I will chance the rear wing for
a 3D printed one from ProSpeed: not only the 3D wing is lighter but also more flexible than the original.
Below you can see some of the parts inside the body that I decide to remove. These include the plastic parts that hold the front light elements, the
small posts that support the air intakes on the side of the body, side-reinforcements that lock the body to the chassis (just in front of the rear
wheel arches) and the extra plastic of the windows.

Concentrating on the windows, I separated the rear window from the rest of the glass part and removed the extra material that is not really necessary
to hold the windows in place. By doing this, I managed to drop .5 gr from the top of the car.

The next step is to take the dremel and start removing material from the roof, sides, top of the rear wheel arches and hood area.

After all this work, the car is getting to a point where its weight is not that bad.
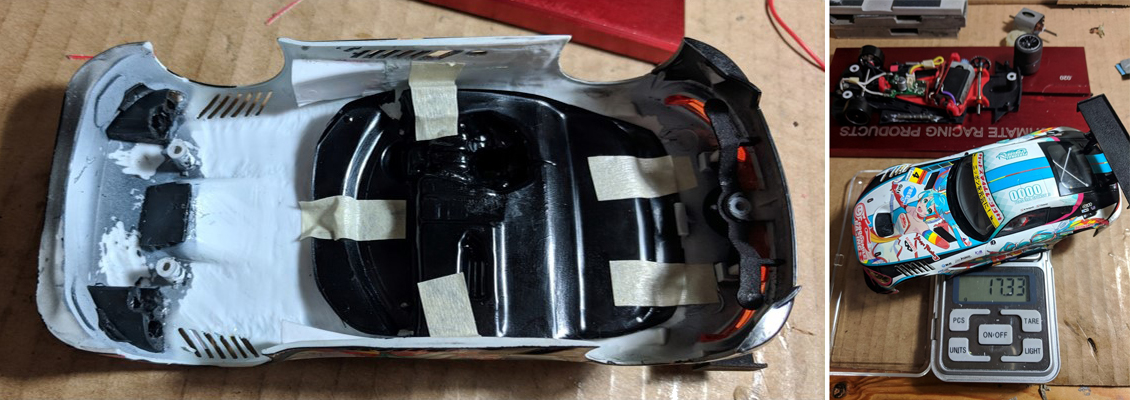
For the body only (picture below on the left) the weight is 11.74 and with all the bits and bolts including the windows but excluding any interior I
was able to get to 15.6 gr (picture below on the right).

I will follow up with some pictures of the the chassis and the setup for DiSCA.
with kind regards
Gio
|
|
|

|
Grunz
Posts: 32
Registered: 3-7-2014
Member Is Offline
|
|
posted on 16-11-2018 at 03:43
|

|
|
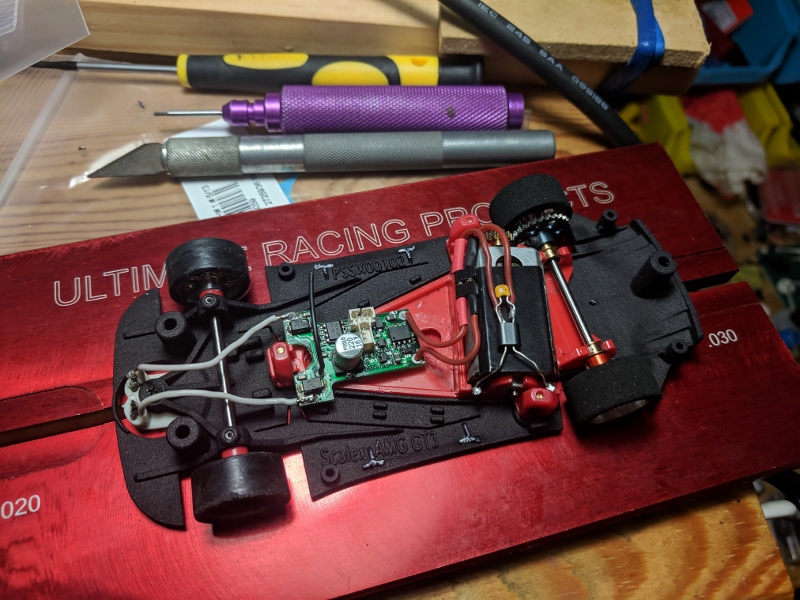
For the chassis, I went for the ProSpeed manufacturer using the NSR pod option.
ProSpeed also offers a version of this chassis for the slot.it pod (which I have and could lead to an interesting comparison).
The setup is straightforward following the DiSCA regs: the motor is the Scaleauto Baby Sprinter with the Scaleauto sponge tyres.
Front wheels are NSR and the gearing is a 14/28 (plafit pinion on NSR gear).
I have added suspensions and the B1 chip which sits pretty fast on the pod after I removed the plastic where the magnet is located.

The 3D printed chassis comes with details for the exhausts which I removed because I wanted to use the one from the scalex chassis.
Another operation that is necessary to do reduce the height of the front of the body when it is mounted on the chassis.
What I did was to file down the posts on the chassis (you can achieve the same by doing the operation on the body posts)
Below you can see a pre- (left) and post-operation (right) picture: as you can see on the right picture there is less space between the front wheel
and arch.

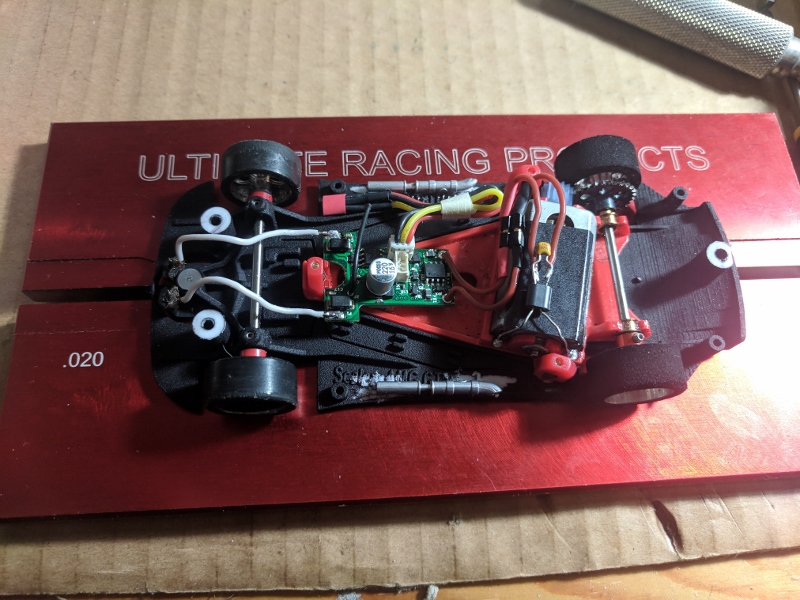
Below you can see the finalized chassis:

with kind regards
Gio
|
|
|

|
tamar
Posts: 804
Registered: 5-1-1989
Location: Gouda
Member Is Offline
Mood: A new beginning 
|
|
posted on 19-11-2018 at 01:57
|

|
|
Hello Gio
Thank you for your great write up on the Scaley AMG GT3.
As you may know we raced the AMG at the last Disca GT3 race @ Rockingham. So a write up on that car was in the planning, but since you've made such a
great start...I'll add my stuff to your post.
Well done
p.s. I did edit/ resize the images in your post so the whole post stayed within the site layout 
If you click "edit" on your posts you can see the html code I used to resize, its very simple and makes for a much cleaner read.
|
|
|

|
Grunz
Posts: 32
Registered: 3-7-2014
Member Is Offline
|
|
posted on 20-11-2018 at 22:36
|

|
|
Part 3
Here are some more progress on this build.
First of all, I would like to point out some of the nice features you get with the ProSpeed chassis.
The chassis has some cuts around the pod which give more flexibility (Yellow dashed lines in the pic below).
Additionally, there are 4 holders for grubscrews that help in setting up how the body sits on top of the chassis (Yellow arrows in the pic below).

To help with the body height setup, the version of the chassis I got has a support that is going to be clipped on the body rear mount. Below you can
see both the support and the way in which it is clipped on the body.
The arrows point to the points that get in contact with grabscruwes on the chassis. The two forward grabscrews sits right below the two vents on the
body (in the picture below you can only see one).

The next step is to look for a lightweight interior. The original scalex one is one of the new flatpan design but it still weighs more than 4 gr. For
a lightweight option there is not official third-party option available for the scalex AMG yet. Maybe slot.it will do one pretty soon.
For now, if you do not want to vac-form one yourself there are two options available.
Option 1 is to use the lightweight interior for scaleauto porsche 991. However, be aware that the porsche interior is too long and needs some cutting
in the rear part.
Option 2 is to use the lightweight interior for the scaleauto SLS (this is the old Merc model not their new upcoming AMG model).
Picture below shows the original windscreen with the two side windows, the lightweight window and the lightweight interior.

The nice thing is that the lightweight windows fit perfectly in the current body (see pic on the left below). However, the shape of rear window is
different between the two models (the SLS being narrow and wider). You can still save 1.5 gr by not using the original scalex windscreen and side
windows. For the timeeing I am not taking this route and you will see why in a sec.
Also in the pic below you can see how the interior of the SLS fits pretty good in the AMG model (right picture).

As an extra bonus, you can get to fit the rollcage that comes with the scalex interior on the lightweight one.
I still need to paint and decorate the interior (this will be the next step during the weekend).

Now, putting all this together, the body is still 17.28 gr.

Adding lights will probably bring the body to the right min body required for the DiSCA regs. This will be the next step. My plan is to not add any
light board and connect the LEDs straight to the oXigen chip's light socket.
However, be aware that the oXigen chip light circuit outputs the same voltage as taken from the rails.
This means that I have to add the right resistors to avoid burning my LEDS.
More to come.
with kind regards
Gio
|
|
|

|
Grunz
Posts: 32
Registered: 3-7-2014
Member Is Offline
|
|
posted on 27-11-2018 at 21:31
|

|
|
Part 4
During the weekend I spent some time finalising the interior.
As a starting point, I always try to find pictures of the real interior to take some inspiration.
The picture below shows that the interior is a mix of bare metal parts and flat black. Also it helps with the color of the roll bar. Not visible here,
but the top of the dashboard is of a dark grey color.

Below you can see my take. I first painted the tray semi-gloss black and then used a mix of alclad colors for the top of the dashboard, passenger side
and roll cage. Then I highlighted some of the details of the dashboard, steering wheel and side console. I could have added some more details (like
the netting, water/radio cables and the extended air vent) but maybe I will leave for later.

All this work then will disappear inside the car. Still you can appreciate some of the details if you look closely:

Finally, the way I like to install the interior is by fixing it with masking tape to give a bit more flex. You can also see that the total amount of
body weight went up a bit.

Lights are still a pending task.
with kind regards
Gio
|
|
|

|
tamar
Posts: 804
Registered: 5-1-1989
Location: Gouda
Member Is Offline
Mood: A new beginning 
|
|
posted on 29-11-2018 at 17:30
|

|
|
Helllo Gio
Another great post, nice job on the interior. The different shades of black and grey tones really add definition and detail.
I would trim the edges of the interior a bit more, specially at the rear. You now have a sharp edge facing down, should you pod move up during
suspension travel or if the interior sags just a little bit in a race, these edges will cut your tires. And I would give the whole inside of the body
one more pass with a sharp rounded scalpel before mounting your lights. You'll be able to scrape maybe an extra 0,5 - 0,7 gr out of it which would
leave you 2 -2,2 gr for the lights and a body spot on the 19gr min weight.
Again great job
|
|
|

|


