
DBR9
fola - 16-4-2006 at 09:51
At long last!!!
Got the curbside kit by Rennaisance, and with the help and advice of Michael Graber of Automobile Miniaturen and Etienne of Rennaisance I managed to
get the body of the fine Racer together.
Colour used- Aston Martin Racing Green Metallic, also usable is Middlessex Green Metallic.
Decals and Photo etch parts -(loads of 'em) are supplied in the not inexpensive kit.
Weight-the kit weighs in at about 300 gramms ..... my trusty old mate, Mr. dremel took care of buisiness and cut the
body weight down to a mere 30gramms before paint and decals.
Chassis -will be home made Brass carbon fiber and Plafit s24 parts
Motor -Bison,
Wheels -Sakatsu OZ style
Check out my album
Will keep you posted !
Have a nice easter!
FOLA


Kai - 16-4-2006 at 14:29
Wow, looking good !
2h - 16-4-2006 at 19:03
My hat off to you, fola. I have the same kit, but have not dared to start dermeling - I am planning to clean it and make a GFK copy.
tamar - 18-4-2006 at 16:29
Hello Fola
Car does look good and the interrior looks great, I saw the pic's you send to Michael on how you made the interior parts from sponge?!
I believe/hope that Michael will finish the vacformed interior in time for our race.
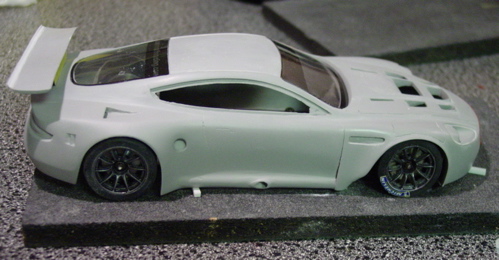
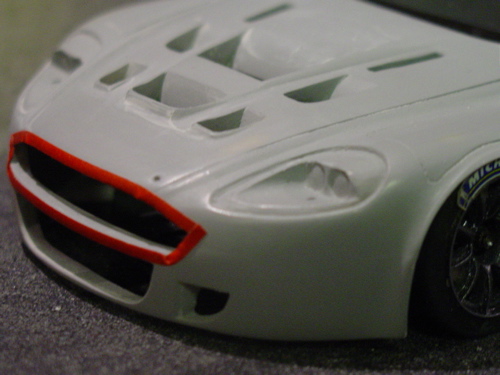
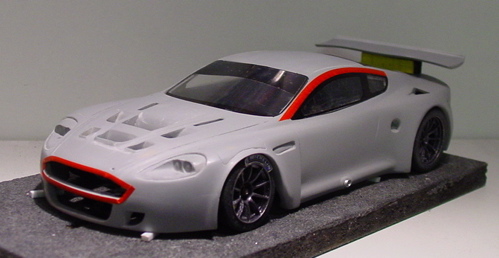
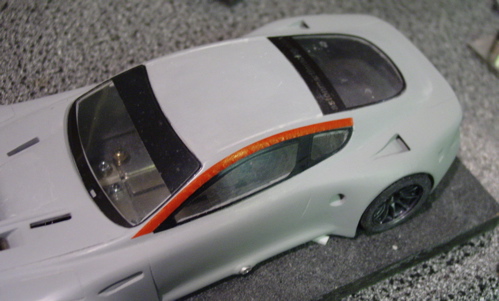
I am working on the FIA GT /ALMS version based on the same kit, but with a different nose and some extra louvres. I also reshaped some areas as I to
what I think is closer to the original ( roof & windows, rear fenders, naca ducts and spoiler)
BTW the inserts are or own casts prodrive/ speedlines modied from a Prodrive Subaru
here are some pics
fola - 19-4-2006 at 07:10
Hi Tamar/Guys,
thanks for the comments,
your version looks pretty good too! Will you race it?
I like the idea about the new Louvres (on the fenders?) and
the extended wheel arches. How much does your body weigh?
Your inserts only have 10 spokes.... is that right? Michael has some
cool inserts that are really light but have 15 spokes as do the Sakatsus.
I will for sure get one or two more models (for less moey I hope ;-) ) A GFK
version would be good (lighter?) or the slot kit .... the red bull is pretty hot,
and of course the #59 .
My interior is still not finished and is a real pain to build. The worse
thing is that loads of the stuff in it will be invisible!!
Michaels interior will surely be great and I will try hard to get my hands on
on....or two as soon as it is available. Is it possible to buy your inserts?
How big are they?
Will keep you updated, you can do the same!
Take care,
Fola


tamar - 19-4-2006 at 08:48
Hello Fola
Off course we will race the DBR, what else should we do with such a thoroughbread.........lock it up it in a show case and throw away the key? 
Interior
Your interior is really makes my mouth water, absolutely gourgeous, all that detail wow!!! But for me there's but one place the Aston must
shine...and that's on the racetrack. Unfortunately that means one has to compromise.
Even for me there are limits to time, work, weight and space available for the Aston.
So we'll limit the detailing to those areas you will still see when the car's finished (dash, driver, partial rollcage)
p.s I saw that you used baremetalfoil for the tub, why didn't you use lexan and Alclad polished aliminium?
C/GFK bodies
The reason for making the GFK/Carbon reinforced bodies is not just that they're lighter (hope to get the bare body down to 26gr) but also stronger
than resin (at least when I make them they are).
This particular DBR will have to survive the LMS 24hrs race on the Blue King (Uden), the 8hrs FIA GT race at (Spa) Eurode and most likely 3rd 24hr
race at Speedlines (Diepenbeek, Belgium). And although we hope to eveda a really heavy crash, everything in the car has to be so strong that it will
survive a head on collision with a deslotted car at 40kmp/hr. Cant have (interior) bits and pieces flying around in the car 
Inserts
You are right, the 10 spoke inserts are actually for a F550, the DBR at Spa (see pic I took in the 24hrs paddock below) used a different 14spoke
design with 2 spokes grouped together. Renaissance actually did a fine job on recreating them, but although the thickness of the spokes is probably
true to scale, they look too skinny and will be too fragile.
The Sakatsu Speedlines are not an option for us as we will have to use inserts at the rear for the handout wheels, and we need freewheeling fronts.
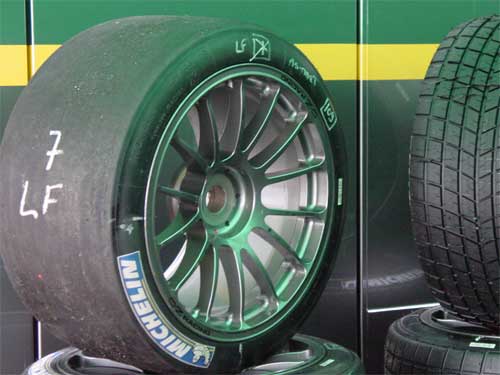
But I might try to make a "fatter" copy of them in the future. Michael (Scaleproduction) made some really nice 15 spoke speedlines, but these are
only 19mmø and we need 20mm (so now you know what size the inserts are) And yes I can send you some, Nick makes them for the guys over here and
charges ± 10 euro
I will keep you posted on the progress
p.s. I will move this topic to the " Body Talk" section of the forum
fola - 19-4-2006 at 09:18
Hi Tamar,
the move to "Body Rap" is totally Legit .
.
The tub is lexan (or some kind of see through plastic sheet)
coverd with (Real) Aluminium tape from the hard ware store. The whole
thing will weigh about 10 gramms with the driver.- Is that a lot?
The dash was a pain had to Dremel it out too from 13g to 2 g...
Will really be cool if Michael gets the Lexan inlet done... Parke even
does the Dash out of Lexan too ....
Hope your GFK will have lots of brothers and sisters, one of which I would
like to adopt 


How do i pay for the inserts? (Front and rear 20mm?)
Fola
tamar - 20-4-2006 at 02:29
| Quote: |
Originally posted by fola
The wholething will weigh about 10 gramms with the driver.- Is that a lot?
|
Considering all the detail you've put in I guess that's about as light as you can get. I assume the driver is a "hollow man" as well?
But still 30gr for the bare body, another 5 grams for paint &decals, 3gram for the spoiler and splitter, 10 for the interior that makes 48gram. I dont
remember what the min bodyweight is for the NDTSW rules but I guess you'll be slightly over the limit if you use anything but the lightest bodymounts

About the inserts do you have paypal?
Can't say anything about extra Aston bodies right now, first have to do those for the FIA GT race and then we'll see
greets
Tamar
fola - 20-4-2006 at 09:42
Well calcutated!
Body weighs 55 gramms with body mounts 
DTSW rules do not list a min. weight. Just the
total weight 185 gramms and Lexan incure a 10gramm
penalty......might as well pimp my cockpit! 
Yes I do have Paypal so send the details and as soon as there is news
regarding bodies , let me know.
Fola
tamar - 20-4-2006 at 11:46
Depends on where you get the 10 gr penalty 
DTSW= 185gr total 55gr body is 70/30% between chassis and body, at least in your case.
LMS= 205gr total, but min 65gr body is also 70/30% but no weight penalties for lexan interiors. So there's more room to shift weight around. Most of
the guys over here use heavy bodymounts (± 20gr) to get a low CG for the body.
BTW when in the DTSW is a interior considered lexan and when not, as you said your tub is lexan with alufoil?!
I ave to check with Paypal on how I can get money, until now I've only used it to send money. Will get back to you on that.
Then last question....got any plans for May 26-27? care to take a trip to Spa 1/24??
fola - 20-4-2006 at 16:05
10g above the waist line.
I will be able to add the remaining 20 g to the body mounts or elsewhere when the car
is finished.
Here we have the SLP series 200g total, no min body weight and chassis FREE.
My Jaguar weighs 33g with a lexan inlet and the rest is chassis and the Bison motor...
Good question, my interior is not "tiefgezogen" vacumed (?) but a sort of plastic sheet material combined with Aluminium tape the dash seat and
driver are resin and the lexan cockpits in question (right?)
26 - 27 may sounds interesting, More info??
Best
Fola
Big Al - 20-4-2006 at 18:30
Hey tamar,
Howzit "boet",
LOVE the DBR9, you guys are really skilled.. Just wish they were cheaper..
Listen, any news on Barcelona yet?? No change on the Webite i see..
And hey, any cahance you could ask Virgin Air to fly a SA Team over there so I can show you how to race cars???
Chow
Big Al
tamar - 21-4-2006 at 00:16
| Quote: |
Originally posted by Big Al
And hey, any chance you could ask Virgin Air to fly a SA Team over there so I can show you how to race cars???
Big Al |
Sorry Boet I called Richard and he said no, so unless you can grab one of those flamingo's migrating north by the tail, flapping your arms will be
the only cheapo option. 
| Quote: |
Originally posted by fola
my interior is not "tiefgezogen" vacumed (?) but a sort of plastic sheet material combined with Aluminium tape the dash seat and driver are resin
and the lexan cockpits in question (right?) |
Yeah, I understand the reason why this rule (10gr penalty) was made but I still think its bogus, first off all the definition of "lexan" isn't
clear and you score less points for a less detailed interior anyhow, so why the double penalty?
Anyhow the reason why I asked for your plans on may 26th/27 is because of the FIA GT race in Euregio. Looks like the German teams could use some extra
drivers
tamar - 25-4-2006 at 06:56
Finally managed to spend some time on the Aston this weekend, the body is now almost ready to take its silicone bath.
With the general reshaping now complete, it was time to rescribe all the panel lines and recut all the holes for the hoodpins and photo-etched grilles
that had been buried under the endless layers of putty and primer. The frontsplitter and rearspoiler have now been added.
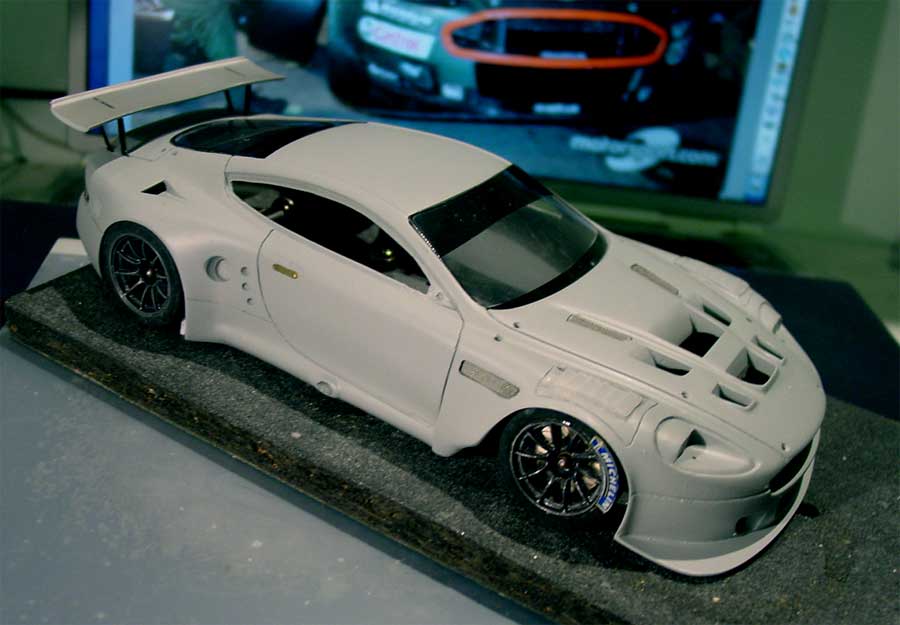
As this will be a slotcar and not a static kit I have decided to incorporate all the photo-etched parts into the mold.
I think that with some masking off the grilles and just a light coat of paint 99% of these details will be transfered to the finished body, but with
the advantage that they can't fall off.
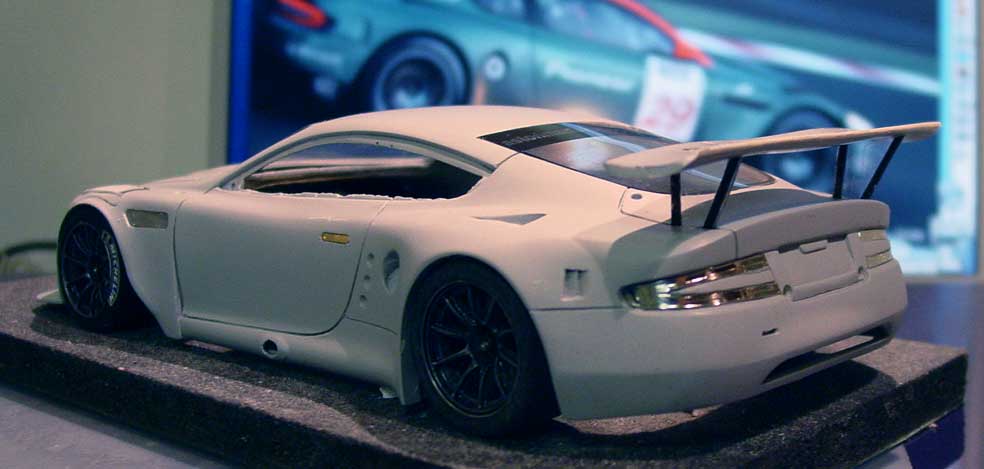
Very interesting is the way Renaissance has supplied the taillights as PE parts as well. I will incorporate these into the mold so I can cut them out
later, after that the plan is to put the body back into the same mold and re-fill the tail lights with clear resin. Hopefully the end result will be
strong smooth and transparent.
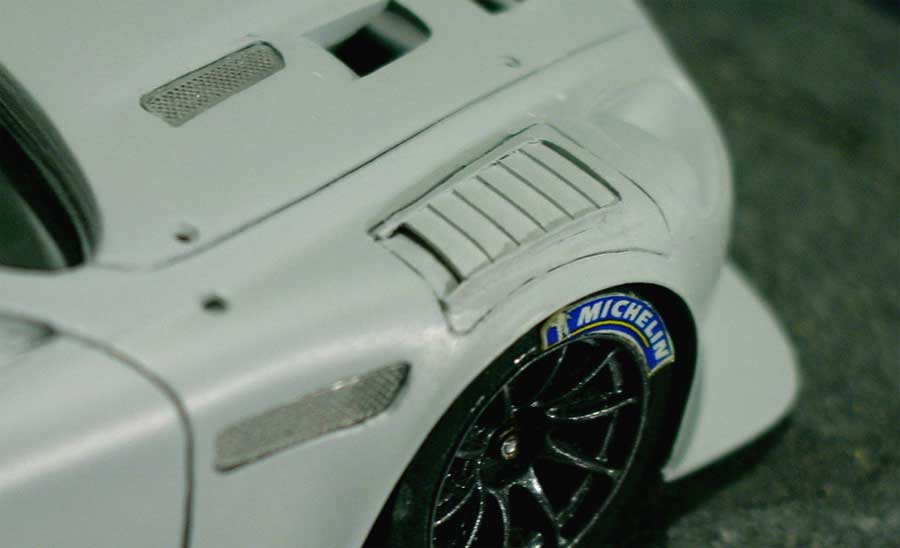
The biggest challenge by far was to create the louvres on top of the fenders. Luckily enough I found a sheet of plastistrut rooftiling that had the
correct dimensions. This was cut, bend and sanded to the correct shape and a small strip of sheetplastic was used to form the edges. To get a better
"fit" I first cut a recessed hole with the shape of the louvres in the front fender. The edges are still a bit too "square" but this will become
better onces the finished model gets painted.
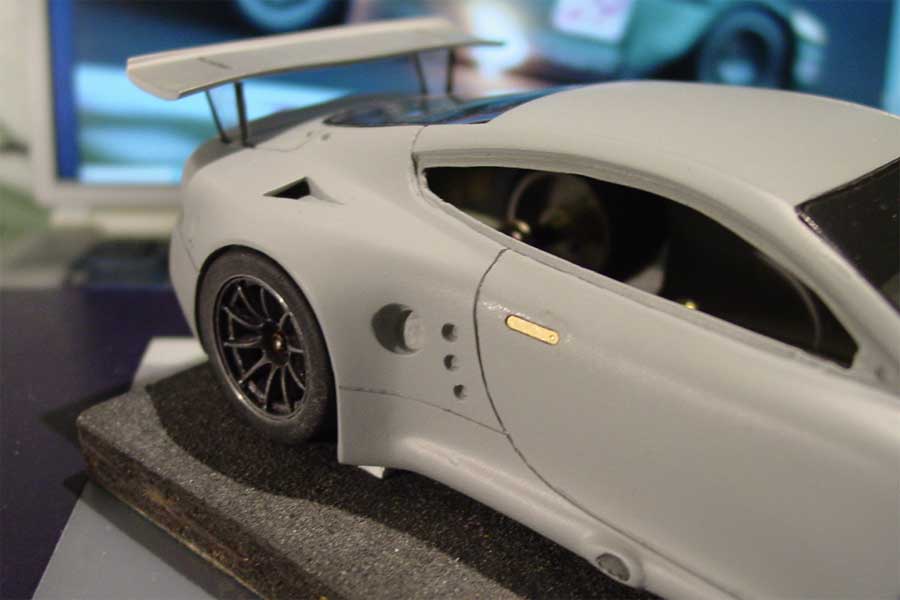
On the "real" the DBR9 the rearspoiler sits quite high and is mounted on very thing aluminium struts. In the kit these are supplied as PE parts, but
no way that these would survive on a slotcar. So I used the same trick as on the Viper. 0.5 mm clear lexan is both flexible and strong enough to
survive medium crashes. By masking the space between the struts you get the appearance of four seperate small struts instead of 2 big ones.
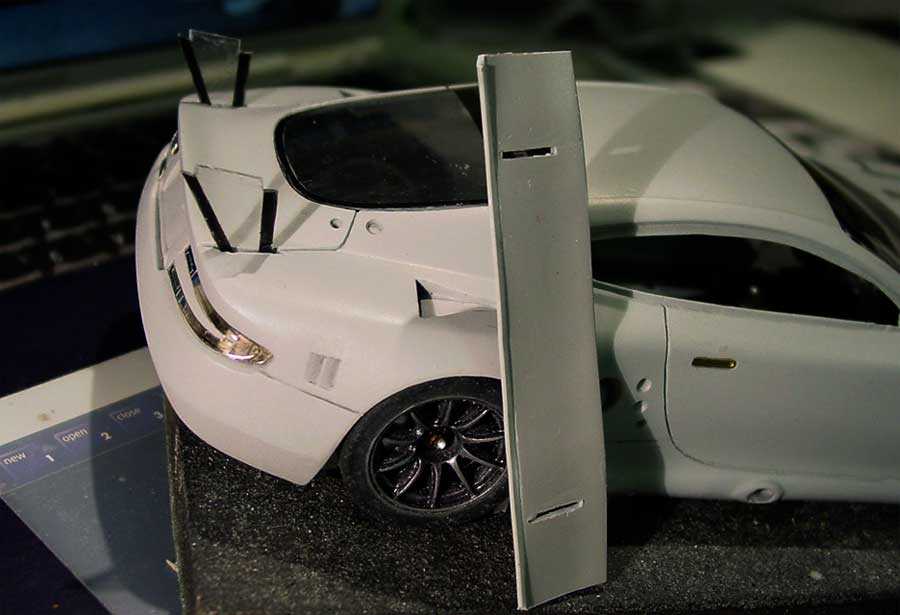
Slots have been cut in the spoiler and the reardeck. Sponge is glued underneath the body slots. I cut the sponge with an X acto knive so the whole
spoiler can be simply pushed in place from the top. The sponge keeps the struts in place but the whole assembly remains flexible and can be easilly
replaced should it come off in a crash.
Last phase will be add the hoodpins and other details Then I have to close all the openings and can finally start pouring some silicone .
fola - 25-4-2006 at 07:35
WOW!!
Big Al - 25-4-2006 at 18:02

Dude!!!! Please.. Your work is TOO much...
will you entertain selling me one of the bodies from your mould once it's done by any chance???
Excellent work Tamar..
Regards
Al
2h - 25-4-2006 at 23:32
Jeeszz, Tamar, you are surpassing yourself on this one - it looks nowhere like the Renaissance DBR9 kit I have in front of me. Looking very much
forward to seeing it - and the Maserati 


Keld Hoefler - 26-4-2006 at 07:58
Great ideas you made on that car, re-fill i the same mold, lexan wing split is also very nice.
infact you made a very very nice job here 
 could be wast of time making our own gfk copy.
I have to think on a way to improve your job, if its possible, looking forward to your car.
tamar - 29-4-2006 at 08:29
Yesterday afternoon I was a happy man, proud of the work I'd done on my DBR9.
I was just about to start pouring the Silicon in the mold....when I recieved a phonecall from my local hobby shop.
The DBR9 from Spark models that I had ordered 3 months ago had arrived!!!
So I rushed over to the Modelshop and the moment I saw her I knew....... Dammn!!!!!!!
Two months of work just went down the drain.
Well back to the drawingboard
Spark models I hat you for making such a so much better looking DBR


tamar - 1-5-2006 at 09:01
| Quote: |
Originally posted by fola
Tamar,
thats a real shame.... but i think that your car is smokin'!! |
hello Fola, hello all
Maybe you are right, but on these things I am a terrible sucker for detail and the overall shape of the Spark is just so much better.
I think the best way to make you guys understand is to make some pictures and let you decide for your self.
And even then I still see room for improvement. But those will have to wait for an other time. We've got barely 2 weeks till the next race.....
BTW Fola , I made a seperate thread
for your Tight Assed XJR 


tamar - 2-5-2006 at 13:10
Hello Guys
I made a a new thread with pictures
of my Aston project as the "old' DBR9 topic was getting a bit long. And this was originally about Fola's Renaissance DBR9 LM so I'll leave it open
for him to post more updates.
slowjim - 2-5-2006 at 21:39
Wow, very nice car. You guys go nuts, that's for sure.
slowjim
fola - 4-5-2006 at 07:03
FINISHED-FINITO-FERTIG-FINÍ-GOTOVO (?) !!!!!!!!!!
yes!! its a done deal.
finished the DBR 9 yesterday, man it was a real challenge and I am pretty happy with
the results. The rear spoiler is made out of a clear plastic tomato pakaging, and the stands
are the original photo etch parts covered with the glue with which they are fixed to the car
and the spoiler itself. I used Pattex extreme repair as it is pretty thick and dries transparent.
Hope it is strong enough!. The mirrors were mounted on 1mm springs so that the look is real
but they are also flexible and will not break as soon as you touch them.... all in all its a cool
car, it runs real smooth the body with cockpit weighs 53g and the chassis 135g. On the heavy side
but looks good! Wanted to add lights and brake discs but dont want to add more weight.... any tips?
Fola


 .
.


